
A lot of people assume an offset smoker has to run entirely on wood. It can—but that doesn’t mean it has to.
I use charcoal every time I fire up The Beast, my Oklahoma Joe Longhorn reverse-flow offset smoker. The charcoal gives me a steady, predictable base. Once the smoker begins approaching cooking temperature, I add hickory for the smoke and flavor.
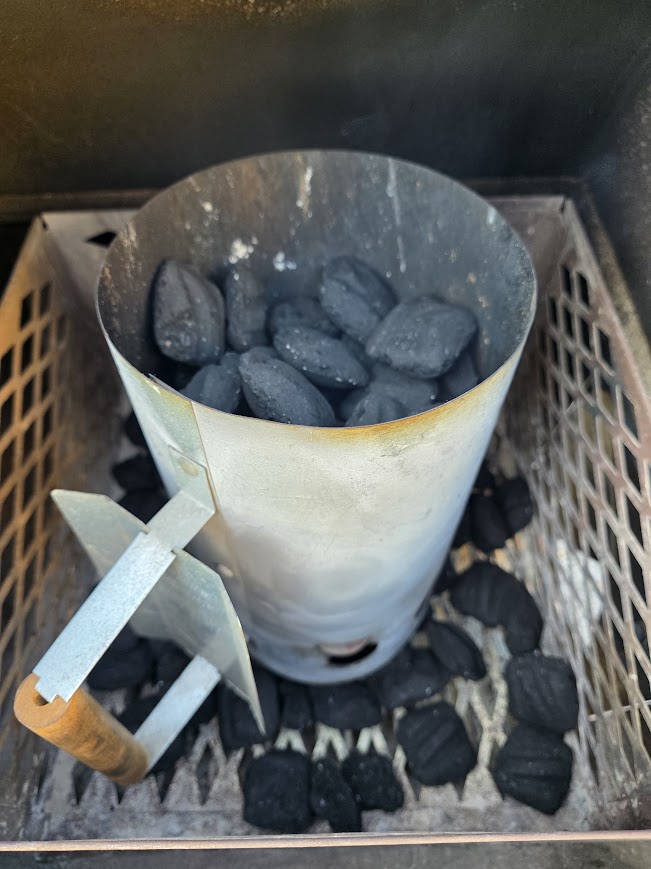
My usual startup is a full chimney of lit briquettes poured over a smaller bed of unlit charcoal in the firebox. I begin with both vents fully open and let the smoker come up gradually. If I have wood splits, I’ll add one small split. If I don’t, a couple of hickory chunks work just fine.
I’m not ready to put food on simply because the thermometer reaches a certain number. I want the fire settled and the heavy startup smoke gone. What I’m looking for is thin smoke—mostly clear, with just a touch of blue.
That’s when The Beast is ready to cook.

Why I Use Charcoal in an Offset Smoker
Charcoal makes the fire easier to establish and gives me a more dependable heat source at the beginning of the cook.
The type of charcoal matters, too—here’s what I’ve found works best when choosing the best charcoal for an offset smoker.
Starting with wood alone can work, but it requires the right splits, the right airflow, and more attention from the moment the fire is lit. A charcoal base gives me time to bring the smoker up to temperature without immediately worrying about whether a wood fire is burning cleanly.
It also provides some insurance later in the cook. Wood splits can carry the fire once a strong coal bed develops, but chunks don’t work the same way. If I’m cooking with hickory chunks, I’ll continue adding briquettes along with the wood so the charcoal maintains the heat while the hickory provides the smoke.
For me, charcoal and wood aren’t competing fuel choices. They have different jobs:
- Charcoal provides steady, predictable heat.
- Hickory adds smoke and flavor.
- Together, they make The Beast easier to manage over a long cook.
That doesn’t make an offset smoker automatic. You still have to watch the temperature, manage the airflow, and learn how your smoker responds. Charcoal simply gives you a more stable foundation to work from.
How I Start the Fire on The Beast
I begin with a small layer of unlit briquettes in the firebox. I’m not trying to fill it—I just want enough charcoal underneath to catch gradually and extend the life of the initial fire.

Next, I light a full chimney of briquettes. Once they’re burning well, I pour them over the smaller unlit bed and open both vents fully. At this stage, the goal is airflow. I want the charcoal burning cleanly and the smoker heating naturally before I begin trying to control it.
I leave the cooking chamber empty while The Beast comes up toward my target range. For most low-and-slow cooks, I’m eventually looking for something around 250–275°F, but I don’t begin closing vents simply because the temperature is climbing. An offset smoker needs time to warm the metal, establish airflow, and settle into a rhythm.
As the smoker approaches cooking temperature, I add the first hickory:
- If I have splits, I use one small split.
- If I’m using chunks, I add a couple of hickory chunks to the charcoal fire.

Then I watch the smoke. The initial wood may produce a heavier cloud, but I don’t put the food on during that stage. I wait until the smoke thins out and becomes mostly clear with a slight blue tint.
If the temperature continues climbing beyond where I want it, I make small adjustments to the firebox vent. I may also close the smokestack vent slightly, but I don’t shut either one enough to smother the fire. The goal is to slow the climb while keeping the fire burning cleanly.
Once the temperature is in range and the smoke looks right, the smoker is ready for food.
I monitor the cooking temperature with a digital thermometer instead of relying only on the lid gauge—here’s the setup I used during my Chef IQ Gen 3 test.
Wood Chunks vs. Splits: How the Fire Changes
I’ve run The Beast with both hickory chunks and wood splits. Both work, but they change how I maintain the fire.
If I have plenty of splits, the fire eventually becomes more wood-driven. The charcoal gets everything started and establishes the first coal bed, but small splits can provide both heat and smoke once the cook is underway. When the temperature plateaus for a while or begins to fall, I add another split and let it catch.
Chunks need more support. They add smoke and flavor, but they usually don’t provide enough sustained heat to carry an offset smoker by themselves. When I’m using chunks, I replenish the fire with briquettes and add the hickory at the same time.
The practical difference is simple:
- Using splits: Add a small split when the fire needs more energy.
- Using chunks: Add charcoal to maintain the heat and chunks to maintain the smoke flavor.
I don’t add fuel according to a strict schedule. Weather, airflow, the amount of meat in the cooking chamber, and the size of the existing coal bed can all change how quickly the fire burns.
Instead, I watch the temperature. If it has plateaued for a while, I begin thinking about the next addition. If it starts dipping, I know the fire needs attention. Adding fuel before the temperature collapses is much easier than trying to rebuild a dying fire in the middle of a cook.
Managing Airflow Without Choking the Fire
Both vents are fully open when I start The Beast. The fire needs oxygen, and restricting the airflow too early can leave the charcoal struggling before the smoker has even warmed up.

Once the temperature approaches my cooking range, I begin watching how quickly it is climbing. If it looks like The Beast is going to run hotter than I want, I make small adjustments to the vent on the firebox. I may also close the smokestack vent slightly.
The important word is slightly.
Closing the vents too aggressively can smother the fire. The temperature may fall, but the fuel begins burning poorly and produces thick, dirty smoke. That isn’t temperature control—it’s trading one problem for another.
I make a small adjustment and give the smoker time to respond. Offset smokers don’t react immediately. If I move a vent and then change it again two minutes later, I’m usually correcting a result I haven’t seen yet.
If you’re still learning which changes require attention, I’ve also broken down why smoker temperatures fluctuate and how to stabilize them.
The smoke tells me whether the fire is getting enough air. Thick white or gray smoke means the fire hasn’t settled or something isn’t burning cleanly. Thin smoke that is mostly clear with a touch of blue tells me the charcoal and hickory are working the way I want.


Temperature matters, but clean combustion matters just as much. I would rather let The Beast run a little warmer with clean smoke than force it toward an exact number by choking the fire.
Common Mistakes When Using Charcoal in an Offset Smoker
Charcoal makes an offset smoker easier to manage, but it doesn’t eliminate the need to pay attention. Most problems come from adding too much fuel, reacting too quickly, or waiting too long.
Adding Too Much Charcoal at Startup
A full chimney already provides a strong initial fire. It only needs a smaller bed of unlit briquettes underneath it.
Loading the firebox with too much unlit charcoal can make the temperature continue climbing long after you expected it to settle. It is easier to add fuel later than fight an oversized fire at the beginning.
Adding Wood Too Early
I let the charcoal bring The Beast toward cooking temperature before adding the first hickory.
Adding wood immediately can create heavy smoke while the smoker is still cold and the fire is trying to establish itself. Waiting allows the charcoal to build the heat first, then gives the wood a cleaner environment in which to burn.
Chasing Every Temperature Change
Offset smokers move. A small rise or fall doesn’t always require an adjustment.
Changing the vents every few minutes or constantly adding fuel can turn a normal fluctuation into a larger swing. Make one small change, give the smoker time to respond, and watch the overall direction instead of every individual number.
Waiting Until the Fire Is Almost Dead
A fading fire is much harder to recover than a healthy one is to maintain.
If the temperature has been flat for a while or begins drifting downward, I start looking at the fuel. With splits, that may mean adding another small piece of wood. With chunks, it usually means adding briquettes and hickory together.
The goal is to support the fire before it collapses—not rebuild it after the cooking chamber has already lost its heat.
Choking the Fire to Control Temperature
Closing the vents can lower the temperature, but closing them too far also reduces combustion.
If the smoke becomes thick and dirty, the fire needs more air. Clean smoke and a manageable temperature range matter more than forcing the smoker to hold one perfect number.
How Much Charcoal Does an Offset Smoker Use?
There isn’t one amount that works for every offset smoker or every cook.
My starting point on The Beast is consistent: a full chimney of lit briquettes over a smaller bed of unlit charcoal. What happens after that depends on the fuel I’m using and how the smoker is behaving.
If I have enough wood splits, I may not need to add much more charcoal. The splits provide heat, create new coals, and gradually take over more of the work.
If I’m using hickory chunks, I expect to add more briquettes during the cook. The charcoal remains the primary heat source, while the chunks provide smoke flavor.
Charcoal use can also change based on:
- The outside temperature and wind
- How much meat is in the cooking chamber
- The temperature you’re trying to maintain
- How often the smoker is opened
- The length of the cook
- How efficiently your particular smoker holds heat
That is why I don’t measure an entire cook by a fixed number of briquettes or bags of charcoal. I begin with a repeatable setup, watch what the temperature is doing, and add fuel according to what the fire needs.
After enough cooks, you begin recognizing your smoker’s pattern. You know how long the initial charcoal bed usually lasts, what a falling temperature looks like before it becomes a problem, and how much fuel you can add without creating a spike.
That familiarity matters more than finding a universal charcoal formula.
Final Thoughts: Charcoal Gives the Fire a Foundation
Yes, you can use charcoal in an offset smoker. For me, it is the most dependable way to start one.
A full chimney of lit briquettes over a smaller unlit bed gives The Beast a steady foundation. Once the smoker approaches cooking temperature, I add a small hickory split or a couple of chunks and wait for the smoke to become thin and clean.
From there, the fire changes depending on what I have available. Splits can eventually provide both heat and smoke. Chunks need a continuing charcoal base. Either way, I watch the temperature’s direction instead of following a rigid refueling schedule.
That is the larger lesson I’ve learned from cooking on an offset smoker: the fire tells you what it needs.
A plateau means it may be time to prepare the next addition. A falling temperature means the existing fuel is fading. Thick smoke means the fire needs better combustion. Thin, mostly clear smoke with a touch of blue means everything is working together.
Charcoal doesn’t remove the skill from running an offset smoker. It gives you a stable place to begin while you learn that skill.
And once you understand how your smoker responds to fuel and airflow, managing the fire stops feeling like a series of emergencies. It becomes part of the cook.


